This guide explains how to set up the Salesforce Email Trigger integration in TickX IQ so you can automate pre-event, post-event, and other event-based communications. It walks you through creating an API user in Dotdigital, selecting the correct API region, configuring sender details, and enabling the integration. You’ll learn how to build triggered email campaigns in Salesforce, add required merge fields, set timing rules, apply advanced segmentation options, and test campaigns before activation. Once enabled, TickX IQ triggers your Dotdigital emails automatically whenever customer events match the criteria you’ve defined.
Keep reading to learn how to set-up your Salesforce Integration so you can trigger event based emails. You can find out more about email triggers here.
Note: Before you get started you need ensure that your from email is approved and authenticated; Verify DNS Records.
1. Go to Marketing > Integration Settings > Select Salesforce Marketing Cloud Email Trigger > View Details
2. Sign into Salesforce Marketing Cloud in a new tab > Your name in the top right > Setup
.png?width=670&height=144&name=image%20(27).png)
3. In the menu on the left select Platform Tools > Apps > Installed Packages
.png?width=254&height=865&name=image%20(28).png)
4. On this page select New
5. Under name put whatever you like, for this example we’ll use TickX Cart Abandon, you can populate the description too, although this isn’t required.
.png?width=670&height=694&name=image%20(13).png)
6. Select Add Component > API Integration > Next > Server-to-Server
.png?width=670&height=534&name=image%20(14).png)
.png?width=562&height=412&name=image%20(15).png)
7. Under permissions select Channels > Emails > Read, Write and Send. Once selected press save
.png?width=538&height=1205&name=image%20(16).png)
8. Once you’ve pressed save you’ll be prevented with your Client Secret, copy and paste that into TickX.
.png?width=548&height=283&name=image%20(17).png)
9. Close the modal and on this page you’ll see your client ID and your tenant subdomain. Copy your client ID over. To get your tenant subdomain look at the Authentication Base URI and copy the combination of numbers and letters after https:// and before the .auth.marketingcloudapis.com/. In this example it would be mcakpzxdpy8lyjzgaesf5b3r5a9q
.png?width=670&height=687&name=image%20(19).png)
10. For the Account ID select your business name in the top right of the salesforce app to the left of your name, then in the drop down select the numbers after MID: In this example it’d be 12345678
.png?width=670&height=72&name=image%20(20).png)
11. For the Subscriber List field exit Setup by clicking the Salesforce icon in the top left then select Email Studio > Email
.png?width=670&height=118&name=image%20(21).png)
12. From the Email page select Subscribers at the top > All Subscribers > Properties, then copy the External Key and paste it inside of the Subscriber List field inside of TickX. In this example the value would be All Subscribers - 12345
.png?width=670&height=316&name=image%20(22).png)
.png?width=495&height=414&name=image%20(23).png)
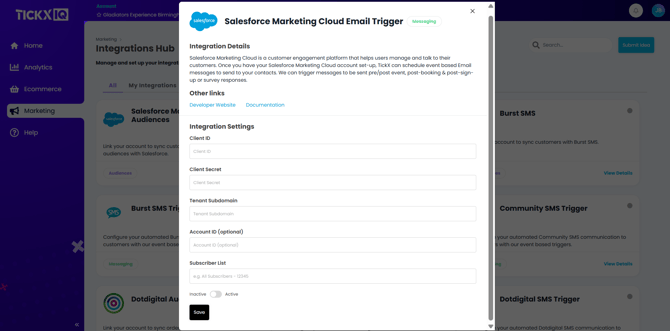
13. Return to Integrations Hub in TickX IQ and add your credentials - Client ID, Client Secret, Tenant Subdomain and Subscriber List
14. Inside of Salesforce go to Email > Content > Select the email you want to send > Copy the customer key, in this example it’s 00000000-0000-0000-0000-000000000000
Add Email Customer Key
.png?width=503&height=579&name=image%20(25).png)
16. When creating a new email here is a list of fields available to you to use.
- FNAME: Customer first name.
- LNAME: Customer last name.
- PREHEAD: Preview text for inbox snippet.
- MC_PREVIEW_TEXT: Alternate preview-text field used by some templates.
- BOOKING_DATE: Formatted event date.
- BOOKING_NAME: Event or booking name.
- BOOKING_VENUE: Venue name.
- TICKET_TYPES: Summary of ticket types in the basket.
- ORDER_SUMMARY: HTML order summary block.
- ORDER_SUMMARY_RAW: Plain/raw version of the order summary.
The following fields are required - TICKX_UNSUBSCRIBE_URL: Unsubscribe link for cart-abandon emails.
- FLOW_URL: Checkout/cart recovery link for the CTA.
- TICKX_TRACK_PIXEL: Hidden tracking pixel for cart-abandon reporting.
17. When you’re ready make sure to activate the email flow and press save then you’re ready to go.