This guide explains how to set up the SendGrid integration in TickX IQ so you can automatically sync transactional data and customer audiences. It walks you through creating a full-access API key in SendGrid, adding it into TickX IQ, and configuring customer subscription status. Once enabled, TickX IQ sends new contacts and audience segments into SendGrid, where they appear and update as lists on a regular schedule, enabling targeted, automated email campaigns based on live customer data.
How to set-up your SendGrid Integration so you can sync transactional data & audiences from TickX.
Learn more about Audience Synchronisation here.
Learn about using the TickX Audience Builder here.
- Go to Integrations Hub > Audiences > SendGrid Audiences > Add Details
- Enter API Key
- Login to SendGrid
- Settings > API Keys
- Create API Key > Add Name > Full Access > Save
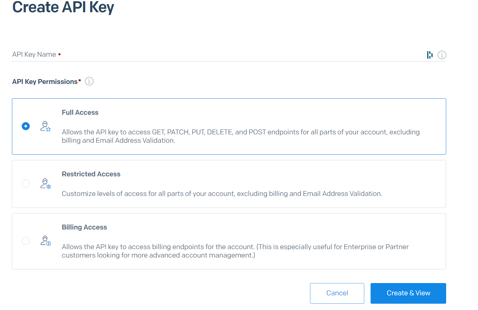
- A new API Key will be created → copy and add this into API Key field in TickX IQ
- Set Customer Subscription Status

- Transactional data & new customers will be added into SendGrid once Audience Sync is switched on. This field will determine whether or not new contacts do get added to SendGrid.
- Set SendGrid Audience to Active > Save
- Your SendGrid Audiences is now set-up. Transactional data and contacts will now be added into SendGrid automatically based on your subscription setting. All TickX IQ toggled audiences will now appear and update as lists within SendGrid.
- Audience syncs into SendGrid every 11 hours.